How to Clean Your Dryer Vent — Prevent Fire Hazards and Boost Efficiency
Learn how to safely clean your dryer vent from start to finish using basic household tools — and why neglecting it can cost you money and put your home at risk.
A clogged dryer vent is one of the most overlooked fire hazards in American homes. According to the U.S. Fire Administration, 2,900 home clothes-dryer fires are reported each year, and the leading cause is failure to clean the vent. But it’s not just about safety — a blocked vent also makes your dryer work harder, increases drying time, wastes energy, and shortens the life of the machine.
The good news? Cleaning your dryer vent is a straightforward DIY job that takes less than an hour, costs little to nothing, and requires only basic tools.
Why Dryer Vent Cleaning Matters
Your dryer doesn’t just remove water from clothes — it moves massive volumes of humid, lint-filled air through a duct that runs from the back of your dryer to an exterior wall or roof vent. Every load sends thousands of tiny fabric fibers through that duct.
Over time, those fibers accumulate inside the duct, forming a dense layer of lint that restricts airflow. When airflow drops, several bad things happen:
- Drying time doubles or triples — a load that should take 45 minutes takes two hours
- The dryer’s internal temperature rises — triggering thermal overloads and component wear
- Energy consumption spikes — your utility bill climbs with every load
- The fire risk escalates — lint is highly flammable, and restricted airflow combined with high heat is a recipe for disaster
How to Tell If Your Dryer Vent Needs Cleaning
Before you start, check for these common warning signs:
- Clothes take longer than one cycle to dry — the most obvious indicator
- Clothes are hotter than usual at the end of the cycle — heat is trapped inside the drum
- The exterior vent flap barely moves — or doesn’t open at all when the dryer is running
- Musty or burning smell in the laundry room — trapped moisture and overheating lint
- Lint screen fills up after every load — this can indicate airflow issues in the duct, not just the screen
- You haven’t cleaned the vent in over a year — annual cleaning is the minimum recommendation
If you check two or more of these boxes, your vent needs attention.
What You’ll Need
Most of these items are already in your home or cost under $20 total:
- Vacuum cleaner with a long crevice tool or hose attachment
- Dryer vent cleaning brush kit (optional but recommended — $10–$15 at any hardware store or online)
- Screwdriver (Phillips head, typically)
- Shop vac (helpful but not required)
- Flashlight (for inspecting the duct)
- Work gloves and a dust mask (lint dust is an irritant)
- Old sheets or drop cloth to protect the floor
Step-by-Step Dryer Vent Cleaning
Step 1: Unplug the Dryer
Before you do anything else, unplug the dryer from the electrical outlet. If your dryer is gas-powered, also turn off the gas supply valve behind the unit. Safety first — electrical and gas connections are nothing to rush through.
Step 2: Pull the Dryer Away from the Wall
Slide the dryer forward carefully. You’ll need about 12–18 inches of clearance behind it to access the vent connection. Protect your floor with old sheets or cardboard to avoid scratching.
Step 3: Disconnect the Vent Duct
The vent duct connects the back of your dryer to the wall with a clamp or a friction fit. Loosen the clamp (if present) and pull the duct off the dryer’s exhaust port. Pull the other end off the wall outlet.
Inspect the first few inches of the duct — if it’s packed with lint, the rest of the run is likely worse.
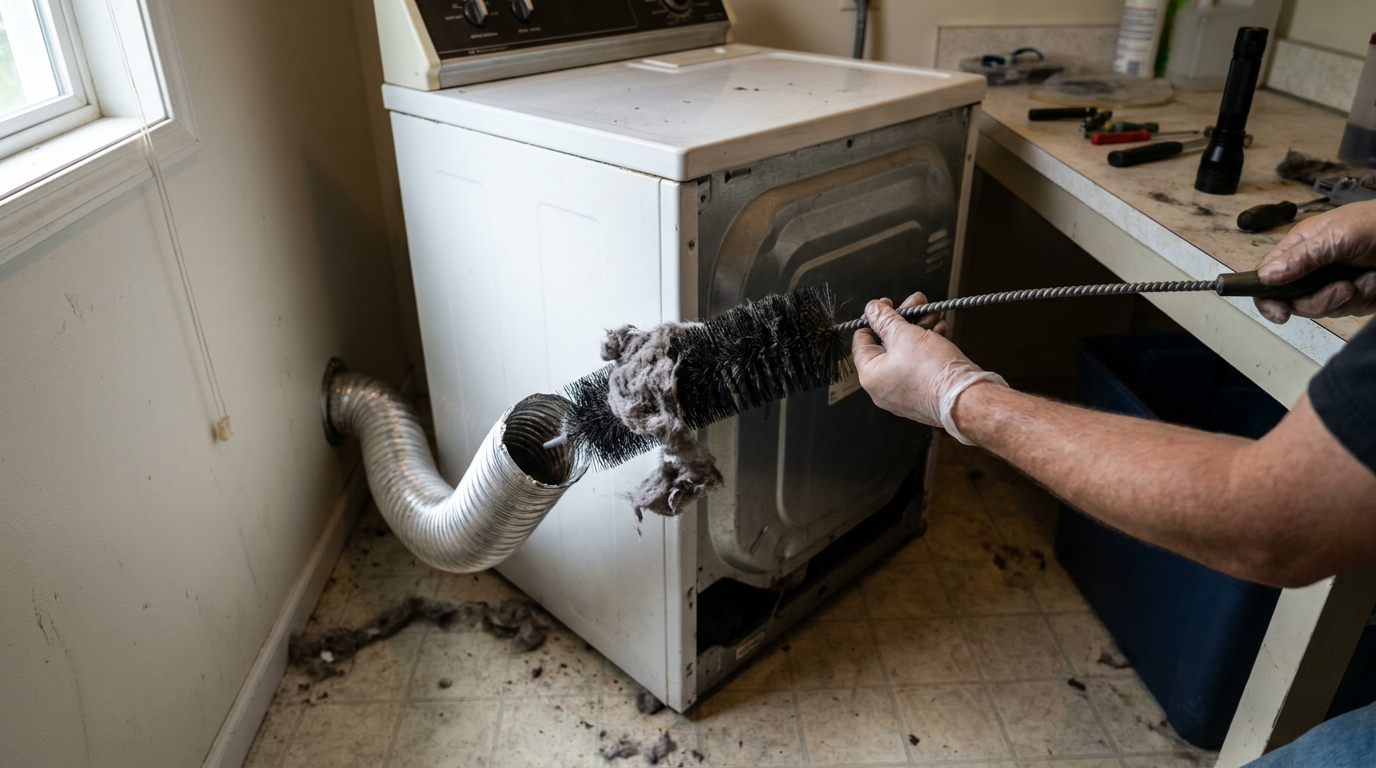
Step 4: Clean the Duct
This is the main event. You have two approaches:
Method A: Vacuum + brush (recommended for most homes):
- Attach the flexible brush rods together and feed the brush into the duct from the wall side
- Rotate the brush as you push it through — the bristles dislodge compacted lint
- Pull the brush back out, bringing lint with it
- Follow up with a vacuum crevice tool inserted from both ends to catch remaining debris
- Repeat until the brush comes out mostly clean
Method B: Shop vac only (for short, straight ducts):
- Insert the shop vac hose as far as possible into each end of the duct
- Use a long, narrow attachment to reach deeper sections
- You may need to go back and forth several times
Step 5: Clean the Dryer’s Internal Lint Trap Housing
With the duct disconnected, reach inside the dryer’s lint trap slot (where the pull-out screen normally sits). Use your vacuum’s crevice tool to pull lint from the housing beneath. This area accumulates surprising amounts of lint that bypass the screen.
Step 6: Clean the Exterior Vent Cover
Go outside and find the vent opening on your exterior wall or roof. Remove the vent cover (usually held by two screws or simply snapped in place). Clean out any lint, bird nesting material, leaves, or debris. Make sure the louvers or flap move freely. Reattach the cover.
Step 7: Reconnect Everything
Reattach the vent duct to both the wall outlet and the dryer exhaust port. Tighten the clamp snugly but don’t overtighten — you just need a good seal. Push the dryer back into place, making sure not to crush or kink the duct behind it.
Plug the dryer back in (and turn the gas valve back on if applicable).
Step 8: Test Your Work
Run a short drying cycle with a small load or just a damp towel. Check that:
- The exterior vent flap opens firmly when the dryer runs
- Airflow feels noticeably stronger than before
- The cycle finishes faster than your previous normal
- No burning smells or unusual heat
How Often Should You Clean Your Dryer Vent?
The National Fire Protection Association (NFPA) recommends cleaning your dryer vent at least once per year. Some households need more frequent cleaning:
| Household type | Recommended frequency |
|---|---|
| Average family (3–5 loads/week) | Every 12 months |
| Large family (8+ loads/week) | Every 6 months |
| Long duct run (over 25 feet) | Every 6 months |
| Flexible foil or plastic duct (replace with rigid duct ASAP) | Every 3–6 months |
| Gas dryer | Every 12 months (lint can be oilier and more flammable) |
Common Mistakes to Avoid
Using a flexible plastic or foil duct instead of rigid metal. Plastic and foil ducts sag, trap more lint, and are more easily crushed by the weight of the dryer. Replace them with rigid or semi-rigid metal duct (smooth interior) for safety.
Only cleaning the lint screen. The lint screen catches the majority of lint from each load, but it doesn’t catch everything. Fine particles and fibers pass through and accumulate in the duct. Cleaning only the screen is like changing your car’s oil filter without draining the old oil.
Pushing the dryer back and crushing the duct. When you slide the dryer into place, the vent duct can get pinched or kinked behind it — especially in tight laundry closets. A crushed duct blocks airflow as effectively as a solid lint plug. Check the duct position before sliding the dryer all the way in.
Venting into the attic, crawl space, or garage. This is dangerous and usually violates building codes. Moisture and lint vented indoors cause mold growth, structural rot, and fire risk. The duct must terminate outside, through an exterior wall or roof cap.
When to Call a Professional
Most vent cleaning is a DIY job, but call a pro if:
- The duct runs through the roof or a second-story wall you can’t safely access
- The duct run exceeds 25 feet with multiple turns
- You’ve cleaned the vent but drying performance hasn’t improved
- You see signs of rodent or insect infestation inside the duct
- Your dryer is heating poorly or not at all (the issue may be the heating element or thermostat, not the vent)
Professional cleaning typically costs $100–$180 and includes a full inspection with a camera scoping tool.
The Wrap-Up
Cleaning your dryer vent is one of the highest-impact, lowest-cost maintenance tasks you can do as a homeowner. It takes under an hour, costs little or nothing, reduces fire risk, cuts drying time in half, and saves money on every load of laundry. Unlike many DIY jobs that require tools you have to buy or skills you have to learn, this one uses what you already own and is nearly impossible to mess up.
Set a recurring annual reminder. Unplug the dryer. Pull out the brush. Your wallet — and your home — will thank you.