How to Flush Your Water Heater — Annual Maintenance Guide for Longer Life
Learn how to safely drain and flush your tank-style water heater in under two hours to remove sediment buildup, restore heating efficiency, and add years to its life.
That rumbling noise from your water heater is trying to tell you something
If your tank-style water heater makes a popping, rumbling, or crackling sound when it fires up, it’s not haunted — it’s full of sediment. Those sounds are pockets of steam popping through layers of mineral buildup at the bottom of the tank.
A water heater with heavy sediment buildup uses more energy, delivers less hot water, and dies years before it should. The fix is simple: an annual flush that takes about an hour and costs nothing if you already have a garden hose.
This guide walks you through the full flush process for a gas or electric tank water heater — safely, step by step.
Why sediment buildup is bad for your water heater
Your water heater’s burner (gas) or lower heating element (electric) sits near the bottom of the tank. Over time, minerals naturally present in your water — calcium carbonate, magnesium, silica — settle out of the hot water and form a hard layer on the tank floor.
That sediment layer acts like insulation. The burner has to run longer and hotter to heat water through the crust. You get:
- Higher energy bills — a ¼-inch layer of sediment can reduce efficiency by 10–20%.
- Less hot water — the sediment takes up tank volume and insulates the water from the heat source.
- Noisy operation — trapped moisture under the sediment layer boils, creating popping sounds.
- Early tank failure — the metal floor of the tank overheats, cracks, or corrodes from the constant heat without water contact.
The solution? Drain and flush the tank once a year. It’s like changing the oil in your car — cheap prevention that avoids expensive replacement.
What you’ll need
| Tool | Purpose |
|---|---|
| Garden hose (long enough to reach a floor drain or outdoors) | Draining the tank |
| Bucket | Catching residual water |
| Flathead screwdriver | Opening the drain valve |
| Adjustable wrench | T&P valve or drain valve backup |
| Work gloves | Protection from hot water |
| Safety glasses | Protection from splashes |
| Teflon tape | Optional — resealing drain valve threads |
Before you start: safety checklist
For gas water heaters: Turn the gas control knob to Pilot or Vacation mode. Do not turn it all the way to Off unless you’re comfortable relighting the pilot later. Turning it to Pilot stops the burner while keeping the pilot lit, making restart easier.
For electric water heaters: Flip the breaker for the water heater at your main electrical panel to the Off position. Confirm power is off — the display should go dark and the water should begin cooling. Do not skip this step, even if you’re “just draining a little water.”
You should also:
- Wait 1–2 hours for the water to cool to a safe temperature (warm, not hot — around 100°F or cooler) before draining. Hot water can damage your floor, your lawn, or you.
- Place the bucket under the drain valve and T&P valve area to catch drips.
Step-by-step flush procedure
Step 1: Turn off the cold water supply
Locate the cold water shutoff valve on the pipe going into the top of the water heater. Turn it clockwise (righty-tighty) until it stops. If you don’t have a dedicated shutoff, you may need to shut off water to the whole house at the main valve.
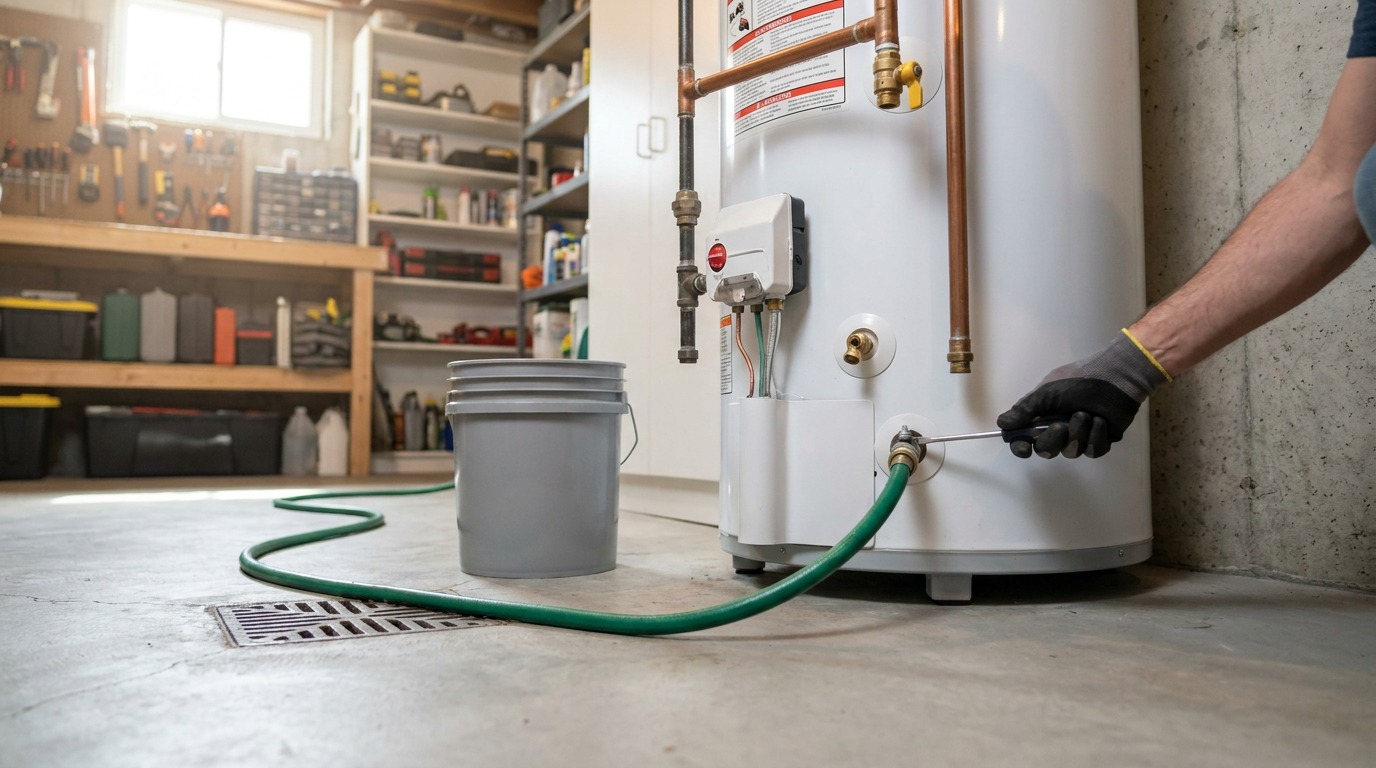
Step 2: Connect the garden hose
Find the drain valve at the bottom of the tank. It looks like a standard outdoor hose bib but smaller — typically brass or plastic with a knob or threaded cap.
Screw your garden hose onto the drain valve hand-tight. Run the other end of the hose to a floor drain, a utility sink, a sump pit, or outdoors where the hot water won’t damage plants or concrete.
Step 3: Open a hot water faucet
Go to the nearest hot water faucet in your house (a laundry sink or bathtub works best) and open it fully. This lets air into the system so the water heater drains faster and prevents a vacuum lock.
Step 4: Open the drain valve and drain the tank
Use your screwdriver or pliers to open the drain valve. Water will begin flowing through the hose. If the flow is weak or stops, the drain valve is probably clogged with sediment — see the troubleshooting section below.
Let the tank drain completely. A full 40- or 50-gallon tank takes 20–30 minutes to drain. You’ll see the water run clear at first, then turn brown or rusty as sediment flushes out.
Step 5: Flush the tank — the critical step
Draining alone isn’t enough. You need to flush the loose sediment out.
With the drain valve still open and the hose still connected:
- Briefly open the cold water inlet valve (the one you closed in Step 1) for 10–15 seconds.
- Water will rush in, stir up sediment at the bottom, and push it out through the hose.
- Close the cold water valve again.
- Let the tank drain completely.
- Repeat this cycle 3–5 times until the water running out of the hose runs mostly clear or only lightly cloudy.
Don’t open the cold water fully or leave it open too long — you want short bursts that agitate the sediment without refilling the tank completely.
Step 6: Close the drain valve and remove the hose
Close the drain valve firmly (hand-tight only — don’t overtighten plastic valves). Disconnect the garden hose. Close the hot water faucet you opened in Step 3.
Step 7: Refill the tank
Open the cold water shutoff valve fully. You’ll hear the tank filling and air pushing through the pipes. Go back to that open hot water faucet — it will sputter and spit as air bleeds out, then run steady.
Important for electric heaters: Let the tank fill completely before restoring power. Keep the hot water faucet running until the flow is smooth and steady with no air bubbles. This can take 5–10 minutes. Air in the tank can destroy heating elements instantly.
Step 8: Restore power or gas
Electric: Flip the breaker back to On. You should hear the elements cycling on within a few minutes.
Gas: Turn the gas control knob from Pilot back to the desired temperature setting. You may hear the burner fire up within a minute.
Step 9: Check for leaks
After 10–15 minutes, inspect the drain valve for any drips. If it’s seeping, tighten it gently — just a quarter turn — or replace the small rubber washer inside the valve cap.
What to do if the drain valve is clogged
A clogged drain valve is so common it deserves its own section. If you open the valve and nothing — or barely a trickle — comes out, the sediment has piled up above the valve opening.
Try this before calling a plumber:
- Close the drain valve.
- Open the cold water inlet to pressurize the tank.
- Open a hot water faucet in the house.
- Briefly open and close the drain valve rapidly — the pressure surge can break up the sediment plug.
- Repeat several times.
If that doesn’t work, you can try gently probing the valve opening with a stiff wire or a zip tie — but be careful not to damage the valve seat. If you can’t clear it, a replacement drain valve costs about $10 and is a straightforward swap.
Gas vs. electric: does the process differ?
The flushing procedure is identical for gas and electric tank heaters. The only difference is how you disable the heat source:
- Gas: Turn the knob to Pilot (not Off unless you know how to relight it).
- Electric: Flip the breaker to Off.
The drain valve, hose connection, flush cycles, and refill procedure are the same regardless of fuel type.
When to call a pro instead
Flushing is a DIY-friendly job, but call a plumber if:
- The drain valve is rusted or frozen and you can’t open it without breaking it.
- The water heater is more than 12 years old and has never been flushed. Older tanks can develop leaks or fail when disturbed after years of sediment buildup.
- You see rust or corrosion around the tank body, not just in the drained water.
- The T&P (temperature and pressure) relief valve is leaking or stuck and needs replacement.
- You’re uncomfortable working around gas, electricity, or plumbing. There’s no shame in paying a pro $150–$250 for this annual job.
How often should you flush?
| Water hardness | Flush frequency |
|---|---|
| Soft water | Every 2 years |
| Moderate hardness | Every 12 months |
| Very hard water | Every 6 months |
| First flush of a used tank | Do it now, regardless of last flush date |
Check with your local water utility or test your water hardness with a $10 test kit. If your water leaves white scale on faucets or glass shower doors, you’re in the “every 12 months or sooner” camp.
The bottom line
Flushing your water heater is one of the highest-impact, lowest-effort maintenance tasks a homeowner can do. It takes an hour, costs nothing (assuming you own a garden hose), and can add 5 to 7 years to the life of a tank that normally lasts 10–12 years.
Do it once a year. Put it on the calendar alongside your smoke alarm battery check and your HVAC filter swap. Your water heater — and your wallet — will thank you.