How to Install a Smart Thermostat — Upgrade Your Home's Comfort and Save Energy
Learn how to install a smart thermostat in under an hour, including compatibility checks, wire labeling, mounting, and app setup — no electrician needed for most homes.
A smart thermostat is one of the highest-ROI upgrades you can make in your home. It learns your schedule, adjusts the temperature when you’re away, and can cut your heating and cooling bills by 10–15 percent. Best of all, installation is a straightforward DIY project that takes less than an hour — no electrical experience required, as long as you follow a few basic safety rules.
This guide walks you through the entire process, from checking compatibility to final app setup.
Before You Start: Compatibility Check
Not every thermostat wire setup works with every smart thermostat. Skipping this step is the #1 cause of failed installations.
Check your current thermostat. Remove the cover and look at the terminals. You’ll see letters like R, W, Y, G, C. Write them all down.
Minimum wire requirements by brand:
- Nest Thermostat (standard): Works without a C-wire in most US systems (uses a power-stealing method). Best for simpler setups.
- Nest Learning Thermostat: Also works without a C-wire in most cases.
- Ecobee: Comes with a Power Extender Kit (PEK) that can add a C-wire virtually if you only have 4 wires.
- Other brands (Honeywell, Emerson, Lux): Check the manual — most require a C-wire.
System type matters. Smart thermostats work with standard gas furnaces, electric forced air, heat pumps, and most boilers. They do NOT work with:
- 110V/220V line-voltage systems (common in electric baseboard heaters and wall heaters)
- Proprietary communicating systems from certain brands (check with your HVAC manual or a pro)
Tools and Materials
What you’ll need:
- Smart thermostat (with its included mounting plate and screws)
- Small flathead screwdriver (for terminal screws)
- Phillips-head screwdriver (for wall anchors, if needed)
- Smartphone with the manufacturer’s app installed
- Level (the small bubble kind — most thermostats include a built-in level)
- Drill with 3/16-inch bit (for wall anchors in drywall)
- Wire labels (included with most smart thermostats)
- Camera (take a photo of the existing wiring before you disconnect anything)
Optional but helpful:
- Needle-nose pliers (for straightening bent wires)
- Painter’s tape (labeling wires if the included stickers are small)
- Flashlight (for seeing wires in dark closets or basements)
Step 1: Remove the Old Thermostat
- Take a photo of the current wire connections. This is your insurance policy.
- Label each wire with the sticker that matches its terminal letter (R, W, Y, G, C, etc.). Wrap the sticker around the wire near the terminal.
- Loosen the terminal screws with your small screwdriver. Gently pull each wire free. They may be springy — keep them under control.
- Unscrew the old thermostat base from the wall. Set it aside.
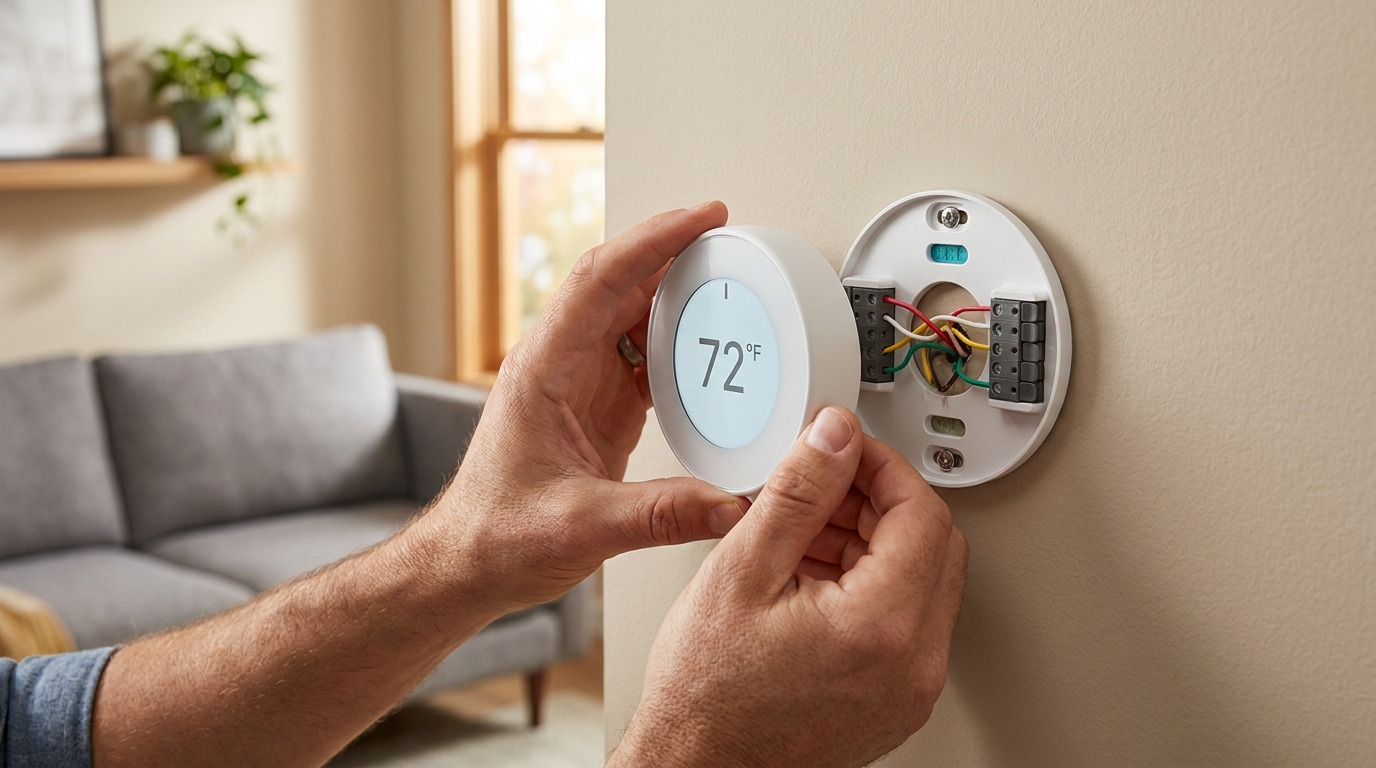
Step 2: Mount the New Base Plate
- Feed the wires through the center hole of the new thermostat’s mounting plate.
- Hold the plate level against the wall. Most smart thermostats have a built-in bubble level.
- Mark the screw hole locations with a pencil.
- If mounting into drywall: Drill pilot holes and insert the included wall anchors.
- If mounting into a stud: Skip the anchors, just drill a small pilot hole.
- Screw the plate into place. Don’t overtighten — you just need it snug against the wall.
Step 3: Connect the Wires
- Match each labeled wire to the corresponding terminal on the new base plate. The letters should match: R to R, W to W, Y to Y, G to G, C to C.
- Straighten the wire if needed and insert it fully into the terminal hole.
- Tighten the terminal screw until the wire is secure. Give it a gentle tug to confirm it won’t pull out.
- Push any excess wire back into the wall. Don’t stuff too much in — leave a gentle loop so the wires aren’t stressed.
Common wire configurations:
- 4 wires (R, W, Y, G): Standard for simple heat/cool systems. The Ecobee PEK makes this work. Nest handles it natively.
- 5 wires (R, W, Y, G, C): The ideal setup — full compatibility with any smart thermostat.
- 6 or more wires: You may have a heat pump (O/B wire for reversing valve) or dual-fuel system. Follow the thermostat’s specific wiring guide.
Step 4: Attach the Thermostat and Restore Power
- Snap the thermostat display onto the base plate. It should click into place.
- Restore power at the breaker or furnace switch.
- Wait for the screen to light up. This usually takes 10–30 seconds. If nothing happens, double-check that:
- The breaker is actually on (check other lights on that circuit)
- The C-wire is properly connected (if your setup uses one)
- The thermostat is fully seated on the base plate
Step 5: App Setup and Configuration
- Download the manufacturer’s app (Nest, Ecobee, Honeywell Home, etc.).
- Create an account or sign in.
- Follow the in-app pairing instructions. This usually involves scanning a QR code on the thermostat or entering a pairing code.
- Answer system questions: The app will ask what type of HVAC system you have (gas, electric, heat pump, etc.), whether you have a heat pump with auxiliary heat, and your preferred temperature range.
- Set your schedule or let the thermostat learn from your habits (Nest auto-learns; Ecobee lets you set comfort settings).
Common Problems and Fixes
| Problem | Likely Cause | Solution |
|---|---|---|
| Thermostat won’t power on | No C-wire or breaker off | Check breaker, verify C-wire connection, or use the included power extender |
| AC won’t turn on | Wrong Y wire or configuration | Confirm Y wire is connected; check app thermostat settings for system type |
| Heat runs continuously | W wire issue or wrong setting | Verify W wire is tight; check if thermostat is set to “Emergency Heat” mode |
| Wi-Fi won’t connect | Router too far or 2.4GHz required | Move router closer or use the app’s Wi-Fi setup; many smart thermostats only support 2.4GHz networks |
When to Call a Professional
Installing a smart thermostat is DIY-friendly for 90 percent of homes, but call an HVAC technician if:
- You have a heat pump and you’re not sure which wire goes where (the O/B reversing valve wire is easy to confuse).
- Your system uses a communicating thermostat (proprietary digital protocols — common with Lennox, Carrier, and Trane systems made after 2015).
- You have a line-voltage system (thick wires, 110V or 220V) used with electric baseboard heaters.
- You tried the installation and the system doesn’t work, even after checking all connections.
- You don’t have a C-wire and the power extender kit instructions seem confusing.
A pro visit for thermostat installation typically runs $100–$200, which is well worth it if you’re uncertain about high-voltage systems or complex multi-stage setups.
The Bottom Line
A smart thermostat installation is one of the most satisfying DIY projects you can do — it’s quick, relatively foolproof for most homes, and it starts saving you money the moment you finish. Take the compatibility check seriously, label everything before you disconnect, and follow the app prompts step by step. In under an hour, you’ll have a thermostat that pays for itself over the next year or two in lower energy bills.